Sunday, October 7, 2012

Fuel Tank Refinishing.


It is time to start working on the CR again, I started today with the fuel tank refinishing. I had done the fenders last winter and a few weeks ago I did the shrouds and side panels.  Today I ordered the new piston kit and a new bearing for the top end, I have to save up a bit of cash to get the cylinder work done.  With any luck and some good ebay sales it wont take too long. 

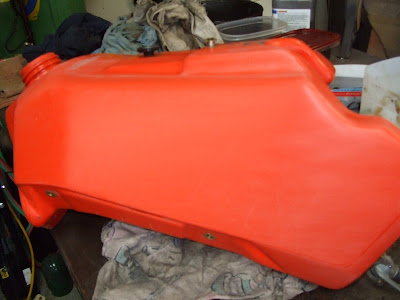
The first photo is the untouched tank, you can see some of the scratches, they give off a glare in the photo.


In the second photo you can just make out the start of the finish process.
 I started with a 320 paper on this tank because the scratches were not very deep. 
Then used 400 and 600 if you decide to do this, don't make circles with the sand paper, they are harder to get out and show up easier.  Use long motions in straight lines, cross your patterns every once in a while with each grit of paper.

The third photo is also before starting at another angle to see the scratches.
This is after the 600 grit followed by two coats of clear,


Same in this photo, after a good long cure (at least 24hrs) I will go back over the tank with 2000 grit (all sanding is done wet) then a final coat of clear.

Below are the shrouds that I refinished last week. Today I put the graphics on. Really happy with how they turned out.


Monday, March 19, 2012

Re-Assembly mock up

I did some clean up on the radiators, they didn't need that much so it was quick. Then I started putting some parts back on the bike.  I put the airbox, radaitors, fenders and some smaller mounting parts as well as the exhaust mounts and pipe just to take a look at how it is coming along.


Plastic Restore part 2

I know in these pictures it may be a little hard to see the scratches that I can see with it right in front of me and with the light just right, but I'm just going to pretend that you can see what I am seeing and post them anyway.


I went to work on the rear fender and the second front fender. I had already put a coat of clear on them after I sanded with the 320 so I went with the 600 grit and sanded them down.

The Finished product looks pretty nice, the front fenders (both the ones that I did) turned out very nice, the Rear on had some deep scars and I decided it was good enough for now and I will probably look for a replacement.

Tuesday, March 13, 2012

Plastic restore

There are a few methods that I have seen out there of restoring plastic, I have chosen to use the fusion clear coat as part of my method of choice.  Most of the methods include sanding and putting a clear of some type over the top to bring back the shine.  So that is what I am doing.  I have two front fenders to work with and I am going to start with the one that is in worse shape.  Although I think they are pretty close to being the same on the front side one of them has some rash on the back side where it was rubbing the frame.  In this photo you can see that the fender is a little dull and you can see some of the scratches in it.  I am going to start with a 120 grit emery cloth to knock down the deeper scratches and take the edges off.  The idea is to not press too hard so that you don't make more deep gashes while you are trying to clean up the ones that are already there.


Here is the fender after the 120 grit and one coat of clear.  At this point or after letting it dry for a couple hours in front of the wood stove, I will sand it again with 400 grit wet paper. 
Click on the images and you can see them enlarged.


After sanding with the 400 I realized that the jump from 120 to 400 was a bit much so it took a little longer to get the desired results with the 400 so on the next one I will do a smaller area with the 120 just on the spots that are already rough then go to a 320 to scuff the lighter scratches.


Here it is after finishing with the 400 grit, ready for another coat of clear.  Then after the clear is applied

Here at the 400 grit clear it already looks pretty good in the photo but up close you can see some sanding lines.  It is totally not necessary to be so anal about that but I am going farther.


Here after the clear dries over the 400 grit I sanded with 600 to farther remove scratches and yet another coat of clear will go on after that. Once that coat of clear is dried I will make the decision as to whether I want to go to 1000 grit paper for the super gloss coat. 

While the clear is drying on the first fender I started at the 600 grit stage I went to work on the rear fender and the other front fender.  I did as I had figured on the first one with the 120 grit I only used it to clean up spots then used the 320 to scuff out light scratches. The rear fender had some pretty deep gashes in it and they cleaned up decent with the paper and a razor blade to get some build up out of the scratches.  The blade also helps take off loose pieces of plastic that can take a very long time to sand down.  The deep scars that you can see in the rear fender will never come out but with a bit more work it will look pretty good. In this photo it is the first coat of clear at the 320 stage and already looks pretty nice. To the right is the other front fender also at the 320 stage.

I will post more on this when these parts dry and I can sand and paint again.

Sunday, March 11, 2012

CR Fork Oil

Today's update is a little slim, things have slowed a bit as I wait for items on ebay to sell so I have more project money.  Actually I have paid for my project bike as of this week and I have some reserves in the account however I also have some very large (large as in expensive, tires, sprockets and chains, Piston kit) items to purchase so I have to save up a few more dollars.  Much of the cash is going toward the KX project until that one is finished. Its getting close. www.kx125project.blogspot.com .  Now on to the CR.

Here is the Oil that I took out of the forks, its a bit grey and murky.  The strange thing was when I was draining the oil it ran clean toward the end of draining and looked pretty good.  My conclusion is that it has sat for so long that the contaminates settled to the bottom.


After I drained the forks I let them sit for a couple days then took the plugs out and drained them one more time to see if any more had run to the bottom.  Then I put several ounces of solvent in and shook that around and pumped them up and down and drained that. It came out pretty dirty and gritty so I did that until the solvent was not so dirty after which I let them sit opened up at the top and bottom to dry the solvent out.  
To replace the old oil I put in 600cc of the nice green Bel-Ray Fork oil that you see in the Photo above.
Back on the Frame they go, Its starting to look like a bike again.


Saturday, March 10, 2012

Front Brake Cleaning

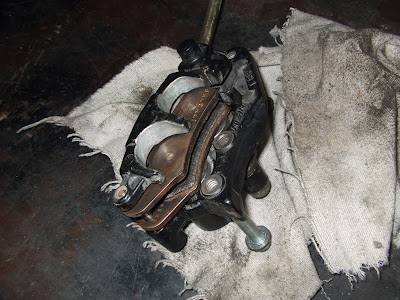
After Going through the rear brake master and caliper I figured it would be a good idea to take a look at the front one.  Turns out that it was not near as bad as the rear.  There was some rust and corrosion on the pads and spring tensioners as well as some corrosion on the pistons.  The Oil in the front was actually clean and clear. The level is a bit low but I will wait to add any until I can mount it on the bike. it will be easier to hold and to bleed the system if needed.  The biggest thing that needed done on this one was to clean the pistons up so they move freely as well as the pins that slide with the caliper. Once that was done it was ready to put back together and wait to be mounted to the bike.

Saturday, March 3, 2012

CR125 restore Photo update.

Lets take a photo look at the progress made today.


I started by making some new gaskets for the water pump housing and putting those in place along with the pump cover.


Then I moved on to Dropping the freshly painted bottom end of the motor into the frame.


Then I moved on to cleaning and inspecting the shock to make sure everything was in fine operational condition. At some point I will have the oil changed in the shock but for now it is serviceable. I removed the seals from the top bushing and cleaned it out and re greased it, then put seals back in place. Also played with the clickers while the shock spring was removed to see if they worked properly, and yes they do.  Finally I mounted the shock in place.  I like how the blue looks with the flash red paint.


I finally got around to cleaning up and greasing the head bearings as well as cleaning the clamps and putting them back on the frame.


Glancing around the work bench I turned my attention to the rear master cylinder and the caliper. It seemed a bit froze up. As I pumped the brake pedal in my hand it didn't do anything at the caliper so what else does a person do? Tear it apart and give it a good servicing.  Started by draining all the old oil out, it was a bit more brown then it should have been.  Then washed solvent through hoses and master cylinder all the way through the caliper till it ran clean.  Then put new oil in the system and bleed that through to get the air out. Also cleaned the outside of the hoses, caliper, master cylinder and reservior. Put it all back together and mounted it to the bike.

Also cleaned and mounted all the electrical components.
Its fun to watch things go back to gether.


Saturday, February 25, 2012

Suspension Meets Frame

Well some of it, I don't have it all cleaned and greased up just yet but I'm working toward that.


I had cleaned up and greased the swing arm a couple days back so it was ready to go on.
With the lower linkage and swing arm in place I will cleaned up the shock next and put that in place.

Chassis Build up Starts as well.

In this post  I have started the chassis re-assembly.  It looks so pretty with fresh paint.
First off I need to clean up the linkage and make sure the bearings are all good and spin nice and free, add grease here please.

Any one Remember these?  Needle bearings with no keeper, they just sit in a little race inside the housing.  These came out nice no grease to speak of so I am surprised they are not rusted. They will have lots of grease when they go back in.

The needles hold in there nicely with grease so you can get them in and all lined up. Packed with grease and ready for the pin.

This one doesn't look so good, its only 3.5 inches away from the other one and its full of rust.  The Bad part is its rusted, the Good part is it can be cleaned up and used.

There it is cleaned up and ready to put back into service.  Load up with grease and its good as new. I also did the lower dog bone linkage, it looked a lot like the first one in this post.


Re-Assembly Begins.

Having finally gotten the frame painted I can now begin that processes of re-assembling the bike.  This is the fun part. I still takes a while to do since most of the cleaning and lubing of old parts takes place just before they are put back on the bike, as well as any painting of parts that might need done.  There are always those things like motors that need painting and fixing before it will be really complete but I will take it as far as possible while waiting for motor parts or whatever else I might need.

Here is the motor with the clutch and the impeller re-installed. I also cleaned the motor cases with solvent then contact cleaner and smoothed out rough spots with  steel wool, then put a coat of hi-temp flat black on as a primer to the gloss black that will be next.

I know some of the restore purists are having fits right now because I didn't take each and every bolt out and split the cases just to do the paint.  Well the cases don't need to be split on this one and I would rather keep it all together.  Also the bolt heads are factory black anyway so its not like they were anodized and would look different.

Friday, February 24, 2012

Motor Check up.

Here is tonight's motor check up.  I got a photo of the motor with the repaired water pump inlet.
Then moved on to cleaning up the outside of the motor cases.  Followed by draining the oil and removing the clutch cover and the clutch.
The Clutch hub is in as good of condition as I suspected judging from the rest of the bike so far.  There is no wear on the edges of the basket which to me is one of the bigger signs of a motors use and abuse over its life.  As  you can see there is some oil left sitting on the hub, I cleaned the gearbox out with solvent and wiped the clutch plates clean before putting it all back together.
Next up tomorrow I will finish cleaning the cases then put a fresh coat of engine paint on even though the wear on the side cover is very minimal in its original state.

I also took a moment to put the sub frame on and the foot pegs.
There is a lot of distraction behind the frame so its a little hard to see.

Tuesday, February 21, 2012

Starting the Motor

Well not starting as in firing it up, but starting as in getting started on the work that needs done.

I started by pulling the water pump cover off because I could see some green build up from anti-freeze and figured there might be some corrosion going on in there.  In my typical fashion I forgot to take pics of what that all looked like before I dove in and started cleaning it up.  This would all be more interesting if I could remember to do that so you could see actual before and after photos.  So Here it is before but its before I even pulled the cover and you cant see into the water inlet to see the green stuff.  (actually thought I took that photo but, nope)
So here it is after I cleaned all the corrosion out of the impeller housing.
Thankfully the impeller came off very easily, the shaft didn't have any corrosion on it at all.  There is a small pit on the sealing surface at the bottom, you can see it just below the shaft.  There is also a hole corroded all the way through at the bottom of the pump input that is about the size of the tip of a ball point pen.  I cleaned all loose material and corrosion out scraping and spraying with solvent multiple times until all the white and green stuff was gone then used contact cleaner to get rid of any other impurities. Then using good old JB Weld filled in the pits and the hole.  In 24 hours it will be good as new.

Monday, February 20, 2012

Fresh Flash Red Paint

Well I finished the frame Prep and didn't take any photos of it, really not that interesting maybe or the fact that I didn't have the camera with  me and didn't feel like going in and getting it might have some thing to do with no photos.  I used 120 grit wet paper to sand down all the exposed and rusted parts to bare metal then used a worn 220 to go over all the painted areas to scuff the surface. Then cleaned the frame with contact cleaner to remove any oils or dust left over.
Any way I did take photos of the finished product.  I painted the frame outside where it is a damp 45* , out in the wood shed so I wouldn't get red paint dust all over everything in the garage. I didn't feel like going through the effort of building a makeshift paint booth.  Any way the moisture in the air left a chalky white film on the finish as it was drying even after bringing it into the garage with the wood stove going. I used the heat gun to warm the frame up and see if the white would go away when dried and yes it did.  Leaving a very nice glossy flash red finish.


I also prepped and painted the sub frame but have not taken photos of it yet, when I do I will post them on this post.  While I was in the Prep and Paint mode I sanded and painted the foot pegs to a nice glossy black finish.